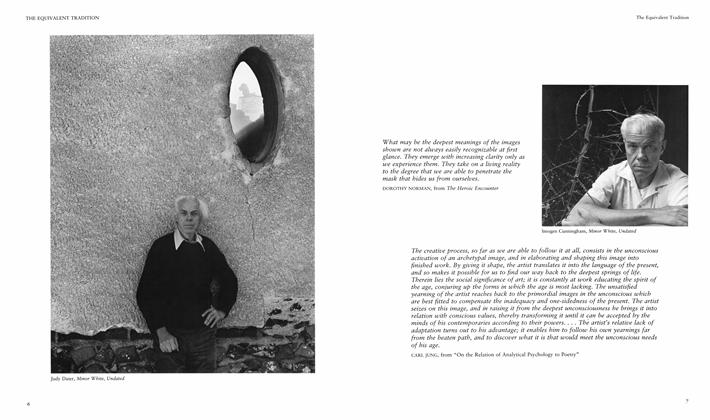
Applications Of The Zone System
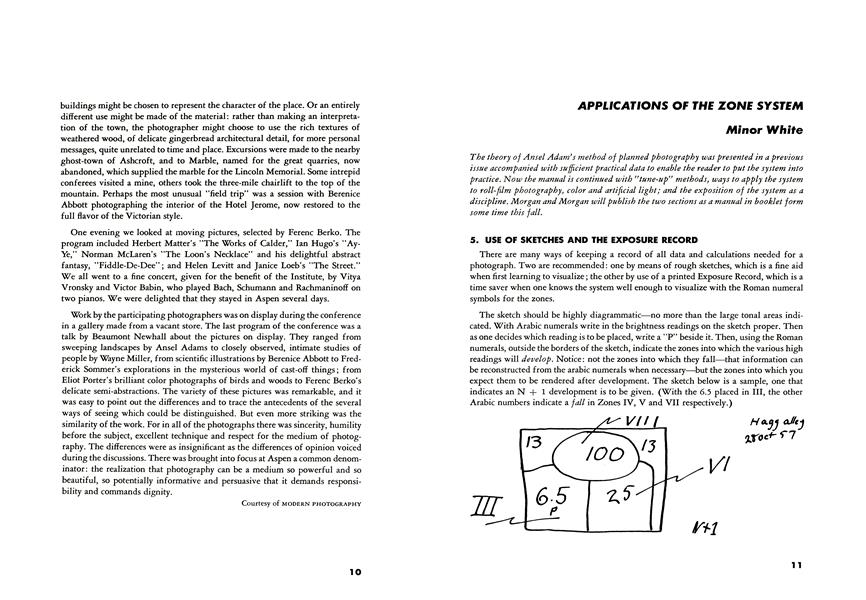
5. USE OF SKETCHES AND THE EXPOSURE RECORD
APPLICATIONS OF THE ZONE SYSTEM
Minor White
The theory of Ansel Adam's method of planned photography was presented in a previous issue accompanied with sufficient practical data to enable the reader to put the system into practice. Now the manual is continued with "tune-up" methods, ways to apply the system to roll-film photography, color and artificial light; and the exposition of the system as a discipline. Morgan and Morgan will publish the two sections as a manual in booklet form some time this fall.
5. USE OF SKETCHES AND THE EXPOSURE RECORD
There are many ways of keeping a record of all data and calculations needed for a photograph. Two are recommended: one by means of rough sketches, which is a fine aid when first learning to visualize ; the other by use of a printed Exposure Record, which is a time saver when one knows the system well enough to visualize with the Roman numeral symbols for the zones.
The sketch should be highly diagrammatic—no more than the large tonal areas indicated. With Arabic numerals write in the brightness readings on the sketch proper. Then as one decides which reading is to be placed, write a ”P” beside it. Then, using the Roman numerals, outside the borders of the sketch, indicate the zones into which the various high readings will develop. Notice: not the zones into which they fall—that information can be reconstructed from the arabic numerals when necessary—but the zones into which you expect them to be rendered after development. The sketch below is a sample, one that indicates an N + 1 development is to be given. (With the 6.5 placed in III, the other Arabic numbers indicate a fall in Zones IV, V and VII respectively.)
In order to have a complete record so that one can check back for errors when pictures do not come out as expected, the rest of the data is needed. This can be facilitated by the use of the Exposure Record. A sample sheet is reproduced on the opposite page. As you can see it has blanks for everything including date and place and description of picture. The latter is important from a documentary standpoint. Some such exposure record is recommended because it provides a means of visualizing the grey scale in symbols for zones and because, as a check list, it relieves the memory of a burden of a large number of details and helps prevent forgetting such things as bellows extension and ƒ stops, exposure factors for filters.
To use the Exposure Record, take meter readings of the various areas and write them in the squares under the Zone numbers on a place and fall basis. To indicate changes of development time, arrows are employed which lead from the zone in which the reading of an area falls to the zone in which one expects to render it by development. In the sample you will see that some of the readings are underlined ; this method is used to indicate actual readings made. The others are written in to prevent getting an actual reading under the wrong zone. For instance in the example used in the sketch (and which appears on line 1 of the sample Exposure Record) it would be easy to write the 100 in some other zone than VII (after placement of 6.5 in III). So by writing 13 under IV, 25 under V and 50 under VI, the 100 is naturally written where it falls under Zone VII. The required N + 1 is indicated by the arrow. And the development time is written in under the square titled DEVELOPMENT. The symbol is used since it conserves space and the time in minutes can be looked up at leisure.
In line 3 an imaginary scene is set up that requires a Normal minus development. Note that the arrow indicates that an exposure that would put an area in Zone IX is to be developed so that it is rendered as Zone VIII. Again note that the N—1 symbol appears in the DEVELOPMENT column.
The rest of the columns provide a space for other data of great importance. "FILM TYPE OR SPEED”; write in the kind of film used or what speed it is being used at. "F.L.” stands for the focal length of the lens used. "EXT” stands for extension of the bellows. If an extreme closeup has been made, the bellows has been extended so far that more exposure is needed. For instance, a bellows extension of 1 y2 times the focal length of the lens requires twice the exposure the meter indicates. If it is extended two times the focal length of the lens, the exposure must be multiplied by four. The multiplying factor is written in the square under "X” in the "LENS” section. If filters are used, the number of the filter is written in under "NO,” its multiplying factor under "X.” "STOP” refers to diaphragm opening. "EXP” refers to shutter speed.
6. THE “TUNE UP”
To convert the various symbols, N, N + 1, N— 1, etc., to developing times in minutes adjustment, must be made. This is true because developing times are published for only a few of the many possible film and developer combinations. And because the published ones can not possibly take into account the light passing qualities of individual lenses or the processing habits of individual people.
To establish the various developing times you will need your camera, your favorite film (if more than one, tests will have to be made for each), your pet film developer, a darkroom of sorts, your own choice of paper and paper developer, and an exposure meter, preferably a Weston Master. (For other types of meters see methods given on page 25.)
The methods given in this manual depend on matching tones by eye, and while only accurate to a degree, will serve the print planning needs of the creative photographer until greater precision is demanded. At which time he can turn to the Adams BASIC PHOTO SERIES or to the methods of sensitometry. As one performs these tests one will discover that it is like calibrating a scientific instrument or adjusting a sports car to racing tune. Furthermore one will finish with a sound grasp of the zone system.
NORMAL developing time must be established first, if for no other reason than all the other developing times depend on it. And because, as was said, a method of eye-match is to be used, a grey scale will have to be prepared as the first step. This grey scale is rather special, it will be continuous in tone and include only Zones Zero, I, II, III and VII, VIII, IX. The steps are as follows:
1. Cut sheets of sensitized paper into strips about 1 inch by 8 inches. (The exact size is not important. )
2. Place one strip under the enlarger (or light bulb suspended over the paper), hold a large piece of opaque material over an inch or so of the strip, turn on the light and move the shield rather quickly, in one continuous motion, till it covers the entire length of the strip.
3. Develop the strip in your usual developer for the time recommended by the manufacturer, and fix.
4. The objective is to produce a continuous tone strip that includes Zone IX white (the unexposed portion) down through a Zone VII grey.
The first attempt will probably prove to be grossly too light or too dark. If so, make the appropriate adjustments in the speed by which one covers the strip with the shield, and repeat. Nothing exact is needed at this stage and if the dark end of the strip happens to reach a Zone VI or even a Zone V grey no harm is done. Only the Zones VII, VIII and IX will be used anyway.
When one has what seems to be a satisfactory strip one can go on to the next step.
5. Take another strip, place it under the light source, have the shield ready, turn on the light and when the exposure reaches what you think will yield a Zone IV grey start covering. Rather slowly cover the strip lengthwise and as before with a long continuous motion. Turn off the light just before the last inch is covered.
6. Develop and fix as before. Be sure to give full development to assure maximum black.
7. The objective is to produce a continuous tone strip including Zone Zero black through Zone III grey. Again more than one try will probably be required to achieve what seems to be the right kind of a strip.
8. After the strips are dry, mark off the various zones with a line. Mark off Zones Zero, I, II and III on the dark strip; VII, VIII and IX on the light strip.
The continuous tone grey scale was made in the manner described above and may be used as a guide in preparing one’s own grey scale. Remember, however, that photographic black may be darker than printed black and that Zone VIII should be lighter than VII and darker than the white of Zone IX. Note also that the differences in the steps of the dark end are not as pronounced as those at the light end. This is normal when the toe portion of the film characteristics are used.
With a grey scale prepared we can proceed to establish the various development times. Methods for both sheet and roll film are given.
METHOD OF ESTABLISHING NORMAL DEVELOPMENT TIME
1. Locate a site whose low readings, if placed in Zone III has high values somewhere that will fall in Zone VIII. (For the sake of accuracy choose a subject with large, single tones, simple areas that can be walked up to and read ; also, in order to prevent reciprocity failure, one in which the lowest reading is at least 13 on the Weston meter.)
2. Expose three sheets of your favorite film at the indicated exposure, using the manufacturer’s film speed rating. If roll film is used, expose the entire roll at the indicated exposure.
3. Develop one sheet at the manufacturer’s recommended time and temperature; one sheet 25% less and one sheet 25% more. (The Table of Suggested Development Times may be used. Page 26, Vol. Ill, No. 1.)
Roll film: cut the roll in three sections and develop as above. The reason for exposing the entire roll will be appreciated when one tries to cut a roll apart in the dark.
To make the tests meaningful complete standardization of printing procedure is necessary; the #2 paper of your own choice, your usual developer; if projection is planned, print through your own enlarger ; if contact printing is planned, employ the usual light source; develop according to the time and temperature recommended by the manufacturer. Complete or "full” development can not be overemphasized, time and temperature development of the strips must be strictly adhered to. Do not juggle development time to get the results wanted. Change exposure time of the negative only.
THIS WE WILL CALL STANDARD PRINT DEVELOPMENT.
4. Select any one of the negatives and by trial and error adjust the exposure so that the area representing Zone VIII of the original scene prints in Zone VIII grey. Match it against the previously prepared grey scale.
THIS WILL BE CALLED STANDARD PRINT EXPOSURE.
Repeat with the other two negatives.
Roll film : take one frame from each of the three differently developed sections and treat as above.
5. Compare the Zone Ill’s with the Zone III of the prepared scale. The areas that are supposed to print in Zone III should be a different shade of grey for each of the three different negatives. One of them can be expected to match in the Zone III of the prepared scale. If luck is with you, one will.
The number of minutes of development of the negative that matches is taken as your Normal development time. (As a check the prints should be dried and compared with the grey scale again.)
Roll film: compare and match one frame from each section as above.
The resultant print will be what is called a "full-scale, full-detail” print: meaning that it has all the zones of grey visible from 0 to IX and that texture and substance of the original is rendered as faithfully as possible by black and white photography. There is no area lost in blackness, none lost in blank white paper. This is the classic photograph and the kind of print taken here as standard. Derivations can be made from it, as said planned derivations, as taste and purpose directs.
THE ABOVE FIVE STEPS CONSTITUTE THE BASIC TESTING METHODS AND WITH VARIATIONS WILL BE USED TO ESTABLISH THE DEVELOPMENT TIMES FOR THE VARIOUS NORMAL MINUSES AND PLUSSES.
If things do not go as anticipated, look in the Zone III area of the negative or print. Obvious errors can be seen by simply holding the negative up to the light. If there is no silver deposit in the Zone III area, serious underexposure is indicated. Check for personal errors first, mechanical faults second, make corrections and repeat the test from step two. If you can barely see through the area in the negative, over exposure is indicated. Check, correct and repeat.
Aside from the glaring faults others are possible:
A. All the printed Zone Ill’s, when matched, are lighter than the Zone III of the prepared grey scale. This means that DEVELOPMENT time is too short.
1. Retake the entire set using the same exposure, but increase development time, one negative by 25%, one by 50% and one by 75%.
Roll Film: Expose an entire roll as before to the same exposure. Cut into three sections in the dark and increase development as above.
2. Print negatives and compare Zone Ill’s. One of the negatives should prove satisfactory.
B. All the printed Zone Ill’s prove darker than the Zone III of the grey scale. This indicates that the development time is too long.
1. Retake the entire set using the same exposure, but decrease development time, one negative 25% less, one 50% less, and one 75% less.
Roll Film: Expose entire roll to the test site as before and decrease development of the three sections as above.
2. Print negatives by the standard method and compare.
Assuming now that one has arrived at a Normal development time, and in most instances no further adjustment will be necessary, we can attack the problem of getting the exposure down to a minimum. In following the methods so far it is quite possible that more exposure has been given the negatives than is actually necessary. Fortunately, excessive exposure by one, two, or even three stops in some cases, will have been compensated for by the latitude of the film. For instance a negative with a given contrast range may require, say, 10 seconds printing exposure whereas another negative of exactly the same contrast, but denser, will take a 20 second printing exposure and a third, still denser, but with identical contrast, may require 40 seconds. So far as the prints are concerned all three will appear nearly the same; and so far as establishing Normal development time would produce identical results. There are reasons, however, for striving for the least possible exposure—speed to capture movement or to take advantage of the least amount of light, faster printing times in the dark room, and minimized grain. Any one of these is important enough to try to have Zone III densities in the negatives as low as possible and still retain textures.* In fact in the jargon of the system Zone III is sometimes referred to as "textured black.”
A method will be given by which fairly accurate shortest possible exposures can be determined. As will be seen, once the exposure is arrived at, it can be permanently put into the calculations by adjustments of the film speed.
* If a densitometer is used the following will provide a starting point. The reading of the unexposed parts of the negative, called "film base” is subtracted from the other readings in the following. For contact printing and for diffusion enlargers Zone I is set at .1. For condenser enlargers .05 is sufficient to separate Zone I from Zone Zero in most photographic papers. We can generalize further —for contrast grade #2 papers Zone II has a density in the negative of about .25 ; the other zones run respectively, .45, .7, .9, 1.1, 1.3 and 1.5 for Zone VIII. The characteristic curves of the paper actually determine the development time of the negative in this system, so negatives must be printed and eye checked for the detail rendition in both Zones III and VIII to achieve the proper match.
METHOD OF ESTABLISHING MAXIMUM FILM SPEED
1. Return to site previously located.
2. Expose four sheets of film as follows: One at 1/3 stop higher; one at % stop higher; one at I/3 stop lower and one at % stop lower than the manufacturer’s rated film speed.
Roll film : Expose two frames each at above changes of film speed.
Include two or so frames at the rated speed for a check.
3. Develop at the newly found Normal time.
4. Print by standardized method and compare Zone Ill’s.
5. Probably more than one of the prints will match. Pick the one exposed at the highest film speed. For instance a film rated at 50 may be found to work at 64.
6. Rerate the film speed and use it thereafter.
This method is not intended as a check on the honesty of the manufacturers ; their ratings, always intended as a guide, are expected to be adjusted to fit the individual camera and individual photographer’s methods.
The eye-match methods may seem cumbersome, inexact or both; and admittedly it is much easier to establish Normal development time and maximum film speed with the aid of a densitometer and an experienced instructor. But lacking these, as most photographers must, a little trouble will have to be taken.
Now that you have your Normal developing time and an adjusted film speed, try them out. Pick a scene that will require Normal development, measure it carefully, in fact with extraordinary care, expose, develop and print mechanically using the standardized method of the tests. The result should be a "full-scale, full-detail” print. If so the established Normal and the adjusted film speed are satisfactory. In all likelihood this print will not be quite as one wishes—this is to be expected. Refinements in the small tonal adjustments, such as dodging and burning-in control, will be needed, or an overall change of density, either lighter or darker may be required to make the print sing.
ESTABLISHMENT OF NORMAL PLUSSES AND MINUSES
1. Locate a site which has a 7 zone brightness range.
2. Expose three sheets of film as indicated by placement of the low readings in Zone III.
Roll film : Expose entire roll at indicated exposure, cut in three sections in the dark and continue as below.
3. Develop the negatives: one at 1*4 times your Normal, one at 11/2 times and one at 1% times.
4. Print by standardized methods.
5. Compare Zone Ill’s.
The development time of one of the negatives which yields the standard "full-scale, full-detail” print is taken as the development time for N + 1.
If none of these development times give the desired result, repeat with times that fall between the previous ones.
For an N plus 2 find a site with a 6 zone contrast range ; expose three negatives, develop 12 and 2y2 times Normal; print and compare. Again the development time of the negative which matches will be taken as N + 2.
For N + 3 employ a 5 zone contrast range, develop 2, 3 and 4 times Normal.
The same general procedure is employed to establish the various Normal minuses. For an N—1 find a 9 zone contrast range subject, expose three sheets of film (or an entire roll) and develop 9/10, % and % of your Normal. Compare and pick the times as previously. Continue for N—2 and N—3. One-half Normal is about the limit with most films since further reduction results in poor print quality. To achieve contractions of the order of four zones or more special developers are required.
Roll Film : If one exposes a whole roll of film to the same contrast range one can apply the zone system exactly as one does to sheet film. Roll film, however, is more often than not (understatement) exposed to several brightness ranges. In spite of intentions to expose a whole roll on the shady side of the street, the important thing always happens on the sunny side midway through a roll. That is one disadvantage. The other is grain. Unless one has a tremendous tolerance for grain the long developments are out. Normal is good, even less is far better. Because of these two requirements a modification of the system has been developed. And while the system was devised with the classic sheet film in mind, it is such a practical bridge between sensitometry and picture making that its integrations accommodate the demands of roll-film photography with the greatest of ease.
7. THE ZONE SYSTEM APPLIED TO ROLL-FILM PHOTOGRAPHY
When the system is applied to roll-film work, the outstanding difference lies in the change of the brightness range control. This control shifts from exposure-development of the negative to the printing variables. Instead of plans to alter the development time of each negative, one employs an "average” development time for the entire roll and plans the paper grade. If so inclined, however, one can plan at the time of exposure what contrast grade of paper will be used and what paper developer. (Or if one is using the variable contrast papers such as a Varigam, then one can plan what paper filter will be used.)
The theory is simple enough. Three scenes are photographed, one of which has a brightness range of 7 zones, one with a contrast range of 8 zones and a third with 9 zones contrast. All three are given Normal development. Full scale prints can be made of all three by printing the 7 zone contrast scene ona#3 paper, which has, in terms of "zones” what amounts to a 7 zone contrast accommodation range ; the 8 zone on the standard #2 (which has what can be called an 8 zone contrast accommodation range) and the 9 zone range on a #1 paper (possessing a 9 zone contrast, so to speak) .
As many students have puzzled out, one has a choice when making exposure-development calculations. When confronted with a 9 zone brightness range, for instance, one can decide to give an N — 1 development and print the negative on a #2 paper ; or one can give Normal development and prittt on a #1 paper; and so far as "full-scale” is concerned the results will be nearly identical. WHICH ONE CHOOSES DEPENDS ON INTENTIONS AND PURPOSES. If one demands the finest possible photographic quality and the freedom to work within the entire scope of the printing variable to interpret a negative, one chooses the N—1. If one is hampered by an ”average” developing time for a roll of film and demands, if necessary, an image at the expense of quality, one chooses the #1 paper. This example is hardly a critical one, but it illustrates the principle of choice involved.
With special paper developers the brightness range control can be extended for rollfilm photography. A table of printing variables will probably be the easiest way to make this clear. In the table below Normal development time is assumed. The Scene Brightness Range also implies the negative contrast range (which with a densitometer can be measured directly from the negative) . The table is only a working device because specific papers are not listed.
Average developer: one containing both metol and hydroquinone such as Dektol. Extra soft: an all-metol developer such as Dr. Beer’s "A.” Extra hard: an all hydroquinone such as Dr. Beer’s ”B.” The Dr. Beer’s formulas are:
(Full development for most projection papers is from about 3 minutes for the Extra Soft to IV2 minutes for the Extra Hard. Solutions A and B can be mixed in other proportions to gain a refinement for paper contrast control.)
As one can see from the table of printing variables* that a roll-film photographer, using a normal development time can control brightness ranges as short as 6 zones and as long as 10 zones. This is equivalent to an N + 2 an an N—2 development time with sheet-film. As is well known the virtue of the miniature roll-film camera is its capacity to be rapidly handled ; and while the roll-film photographer can calculate exposure and development to his heart’s content with the zone system, when he wants to work fast he wants lightning calculations—or better still nearly instinctive ones. With his knowledge codified of the printing variables he is freed of making development calculations over the vast majority of lightning situations. Hence his calculation time can be cut down considerably and we need only to cut exposure calculations down as much to reach his ideal. As we shall see shortly exposure calculations can be reduced materially. But first let us consider a superior developer for roll film.
TWO SOLUTION DEVELOPER
A two solution developer is advantageous because it favors the low exposure zones I, II and III when excessive contractions are given the film of N—2 or more. With such a developer the low zones attain their usual density in the negative while the high zones X, XI, and over are brought to the required Zone VIII printing density. An all-metol developer seems best followed by a second bath of borax. The formulas:
The brightness ranges are controlled by the number of minutes the film remains in the first bath. The second bath speeds up development so that whatever developer is in contact with silver grains is exhausted. In the dense areas the available developer is used up before the grains are fully developed. In the thin areas there is more developer available in proportion to the developable grains so that many of them are fully developed. Consequently the density in the low zones reaches normal printing density while the upper zones are vigorously controlled.
On the next page there is a chart of development times suggested for use. These times will not apply to all films but will serve as a starting point.
* This table applies to sheet-film photography as well. Let us take an example of the thinking and planning that it allows. For instance a scene has a 12 zone brightness range; the particular film on hand and its developer give good results only up to an N — 2. So the N — 2 development is given; the resulting negative has a contrast range of about 10 zones. Referring to the chart one can see that a #1 paper and a soft developer will print that negative full scale. In extreme cases the photographer can employ the brightness range controls of both film exposure-development and the printing variables.
SUGGESTED DEVELOPING TIMES FOR A TWO-SOLUTION DEVELOPER
(NOTE: 1. Expanded developments are not recommended with this developer. 2. It is equally useful for sheet film development.*)
To take full advantage of the two-solution developers exposure by the roll is recommended. For the ubiquitous multi-contrast rolls the students at the California School of Fine Arts under the direction of Frederick Quandt have discovered that an "average” development time of less than Normal was ideal. Obviously a development time that will allow the greatest number of brightness ranges to be controlled is highly desirable and an N—1 or preferably an N—iy2 was found to give maximum control when combined with the printing variables. Approximately from a 6 zone brightness range to a 12 zone brightness range, this is an increase of 4 zones of control, which the photographer does not have to calculate for at the time of exposure. For example, with a 12 zone brightness range the N—iy2 development brings the contrast in the negative to about 10l/2 zones which can be printed nearly full scale on a #1 projection in an Extra Soft developer.
Furthermore the reduced development time aids in keeping the grain at a minimum. Incidentally for roll-film, development at a constant temperature of 68° in developer, Borax bath, short stop, fresh hypo and wash water is highly recommended to keep grain at a minimum.
SHORT CUT EXPOSURE-DEVELOPMENT CALCULATIONS
To speed up calculations to the "nearly intuitive” point exposure calculations can also be shortened as has been said. Note: when lighting conditions are unfamiliar or complex, one should employ the positive methods of metering and visualization, upon which the briefer routines are based.
* The following specific developing times for Super XX film have been given by Frederick Quandt, Photography Department, California School of Fine Arts.
Mr. Quandt recommends this two solution developer ("split D-23” as he calls it) for all Normal Minus development times, both sheet and roll film.
A. TWO READING ROUTINE
1. Take a meter reading of the palm of the hand in shadow, or turned away from the light source.
2. Place this reading in Zone IV and thereby set exposure.
3. Take meter reading of palm of hand in sunlight.
4. Development is determined by the difference in the two readings according to the following table: For a 5 zone difference give N—2 development. For a 4 zone difference give N-—• 1 development. For a 3 zone difference give N development. For a 2 zone difference give N + 1 development.
For instance if the shadow reading of the hand is placed in Zone IV and the high falls in Zone IX, the difference is 5 zones and according to the table above N—2 development is indicated. The print will render the flesh in shadow in Zone IV and the flesh in sunlight in Zone VII. If one prefers flesh in sun rendered in Zone VI an N—3 can be given.
B. ONE READING ROUTINE
1. Development is assumed to be "average at N—iy2.
2. Read palm of hand in sun.
3. Reading is placed in Zone VII and exposure set thereby. OR: 1. Read palm of hand in shadow. 2. Place reading in Zone IV and set exposure. OR: Place reading of important object in selected zone to set exposure.
C. DEVELOPMENT DETERMINED BY WEATHER CONDITIONS
Outdoor lighting conditions repeat themselves regularly. The difference in the reading of a hand in sun and again in shade is about 5 zones on a bright sunny day, and about 4 zones on a hazy day. A table will consolidate this information.
The sample exposures may look odd until one discovers for oneself that the light in the shadow area changes but little while areas in sun change two or more zones.
The zone system applied to roll-plm photography may seem to be a round-about way to be careless. And to a man who has spent ten years achieving a sixth sense for exposure —and who has also acquired it—this is all rather pointless. On the other hand, as many students have attested, the ideal of intuitive exposure-development calculations for miniature camera work can be attained in about a year with the zone system as a basis.
8. THE ZONE SYSTEM APPLIED TO COLOR TRANSPARENCIES AND ARTIFICIAL LIGHT
In color photography for amateur use the zone system has only a limited application and that use is mainly getting accurate exposure for the important parts of a scene. Placement is made according to the IMPORTANT objects, their readings are placed in Zones V or VI. This will allow the color of the area placed to have as correct a color as the materials will allow. Colors whose readings fall in Zone IV and VII will be rendered acceptably accurate, the rest noticeably inaccurate. The low zones will be dense and of a dominant hue depending on the kind of color film used ; the high zones will be thin, "washed out.” As one gets to know what happens in the decidedly off regions the derivations can be used for esthetic purposes if one so chooses. For instance placement of faded colors in VII or VIII can enhance the faded effect. The placement of faded colors in Zone V or IV can increase the intensity of the colors so that the transparency has a richness not noticeable in the original. Underexposure usually makes everything denser, but at times can create a dramatic effect.
In studio photography where lights can be moved at will, the brightness range is controlled by simply moving the lights around on the floor and metering to build up the Normal 8 zone range. Development is standardized at Normal ; or something else if one chooses, and certainly for special effects, such as line copy, for instance, both special film and an expanded development time would be a logical standardization.
An example is in order, let us consider a studio portrait, and take a basic situation, the simplest in fact. Once the model is seated the fill-in or "axis” light is turned on. The cheek is turned towards it so that there is enough area in the light to get an accurate reading. This light should not be as strong as the others. The reading will be placed in Zone IV, and this determines the exposure. Next the main or "directional” light is turned on. A second reading is made of the cheek turned towards the light. This reading should fall in Zone VI and if it does not, the light is moved forwards or backwards, or swung sideways so that the edges rather than the center of the beams are used, till the reading does fall in Zone VI. One may prefer a Zone VII for this reading, but that is a matter of taste and experience. The background light is adjusted till the background reads in some Zone below IV or higher than VI—whichever will separate it from both hair and face. In this light arrangement various highlights and modeling of the face tones will account for Zone VIII, and the whites of the eyes for Zone IX. The folds of the dress or clothes or the hair will account for the low zones.
The difference that is given above between the shadow and the bright side of the face is the normal or classic two-zone difference. This renders all the visible flesh with a sense of substance ! A difference of three zones can be tried as well as a difference of four zones, five zones, or the soot and whitewash portraits—and all can be measured. One will discover almost at once that lighting in the studio is far more contrasty than one realizes.
9. A METHOD OF CONVERTING OTHER METERS FOR USE WITH THE ZONE SYSTEM*
While the dial of the Weston meter is the only one that makes visualization easily apparent to the eye, other meters can be used. The conversions are admittedly cumbersome. A method follows.
1. The first step is to calibrate the two meters. (If the various developing times have been established for the Weston there will be no need to repeat for the second meter.) A. Set the film speed on both meters ; use the Weston ratings for the Weston and whatever applies to the second. B. Select a large, easily measured, single toned area. Take a reading with the Weston and place it in Zone V, opposite the arrow on the dial. C. Observe the indicated exposure in seconds. For instance 1/2 5th at ƒ 11. D. Take a reading with the second meter of the same area. At ƒ 11 it should also give an indicated exposure of 1/25th second. E. If not, adjust the film speed indicator until the indicated exposure is identical with the Weston.
2. The second step is to determine placement and with that determine exposure. A. Using the second meter take a reading of the low value that would be placed in Zone III. Say it reads "X” units and the indicated exposure is y2 sec. at /11. ON MOST METERS IF THIS EXPOSURE WERE ACTUALLY GIVEN THE AREA IN QUESTION WOULD BE RENDERED IN ABOUT ZONE V. B. As we can see Zone V is two zones lighter than we want. So two zones less exposure (or two stops) are planned for an actual exposure. (We will arbitrarily change the exposure by altering shutter speeds throughout this example.) In this case the exposure would be set at l/8 second at /11.
3. The third step is to determine the brightness range and from that the development time. A. The high value is read, the one that is expected to be rendered in Zone VIII. Say that this reads "X” units and the indicated exposure is 1/100 sec. at/11. ON MOST METERS IF THIS EXPOSURE WERE ACTUALLY GIVEN THE AREA IN QUESTION WOULD ALSO BE RENDERED IN ABOUT ZONE V. B. Since we are not placing this value, but trying to see where it falls we can not repeat the previous calculation.
* Incident light meters cannot be used with the zone system. Since they are incapable of measuring light reflected from objects, they can not measure brightness ranges, which in turn makes it impossible to calculate development times with them.
C. Using the 1 /100th as a starting point, we count down, one shutter speed at a time till the exposure time for this case is reached. Thusly :
If exposure of 1/100 will render the high value in Zone V, then an exposure of 1/50 will render it in Zone VI, and an exposure of 1/25 will render it in Zone VII and an exposure of 1/10 will render it in Zone VIII.
By following this procedure we discover that the high value falls in Zone VIII. And since this tells us that the brightness range is an 8 zone, normal one, normal development is indicated. If the high value fell in VII or IX, some other appropriate development time would be indicated.
This process can be seen at a glance if the Exposure Record is used. Write both the high value and the low value readings, in seconds, under Zone V thus :
Next place the low value area in III by counting shutter stops to the left. Then with the exposure in seconds as a guide count the high readings to the right till the high value falls in place. Both these operations are illustrated below:
Below is an example of a three zone brightness range:
10. INTERPRETATION OF NEGATIVES AND INTERPRETATION OF THE SUBJECT
The zone system, when considered as a method of exposure-development, aims, as must be obvious, at controlling brightness ranges via the negative. Hence the negative is not treated merely as a necessary step in the whole process, but the most important step. Even when the system is modified for use in roll-film photography the negative is still in the background of the thinking. When the system is considered as a link between the science of photography and picture content the controls in question become esthetic ones. In the zone system these also are centered in the negative. The previsualized image of a given scene or subject is thought of as residing in the negative. The imagined image is, so to speak, "put” into the negative itself. And meter reading, tonal identification, placement, development to render tones where imagined is the method by which the imagined image is stored in the negative. The ideal negative is one that can be printed without dodging, without burning in, without tonal alterations, in fact as close to mechanical printing as possible—and we might add without any cropping that was not foreseen at the time of exposure. The negative contains the image complete and whole without further interpretation. The moment of exposure sums up everything, the rest makes that sum visible in the print. (To hold to such thinking amounts to a strict and severe discipline. This we will see later is the ultimate value of the system.)
Usually, however, some tonal alterations are necessary, not because of faulty seeing or faulty calculation, but because the translation from a three dimensional world to the illusion of three dimensions on only two automatically forces alterations. Artistically such alterations are all to the good. The photographer is forced to make some kind of a choice as to how he will alter, in what direction he will change appearances. Consequently he must make some kind of an interpretation, and interpretation is his means of imparting the warm personal bias without which his photograph is mechanical.
For the sake of clarity we can distinguish various degrees of interpretation. Mechanical printing, the least interpretive, is still more than just a possibility to be lightly set aside. Not today anyway when so many millions of prints are done by the drug store, by men assigned exclusively to dark room work as in the labs of the huge picture magazines, or more recently by the advent of the Polaroid camera. Probably no interpretation worthy of the name is possible under these conditions, yet we can not overlook the possibility that a photographer can become so well adjusted to mechanical printing quality that he learns to see in just such quality. As an example news photographers have always learned to see in terms of newsprint reproduction rather than the photograph. The Polaroid process ought to make it especially easy to see in terms of that particular product since it is seen on the spot. This process, incidentally, new as it is, is highly reminiscent of the wet plate days three quarters of a century ago, when the photographer if he disapproved of either exposure or seeing could wipe the emulsion off the glass, recoat and try again.
LITERAL INTERPRETATION
Often a photographic tone for tone reproduction of the original scene affects the spectator as false. He will feel that something is wrong, and if goaded, may accuse the photographer of lying to him. Here is where interpretation steps in, some tonal alterations normally have to be made while printing to produce an unquestionably convincing literal photograph. Literal interpretation, then, is the attempt to make a print that seems faithful to the sense of substance and detail, faithful to the sense that feeling was embedded in the original facts.
The most difficult problem of the literal interpretation is to reproduce the facts yet make the spectator realize that there is feeling and meaning beneath them. By definition these out-of-sight facts are a part of the literal interpretation.* Sometimes the tonal and esthetic controls that are inherent in the exposure-development of the negative are not enough so the printing variables are used in addition. Obviously the zone system enthusiast will resort to them only when all else fails. In spite of him one of the secondary reasons for making negatives that will print full-scale, full-detail on a #2 contrast grade paper is to provide the whole scope of the printing variables for interpretive purposes.
NON-LITERAL INTERPRETATION
There is no line at all between these two kinds of interpretation. As every photographer knows from printing experience all negatives have a life of their own ; some are as well behaved as children promised ice cream for dessert, others—ugh. Sometimes a negative can be so strong that it runs away with the photographer. He can become so intrigued with a negative, say of a seascape, so printed that the sky, water and sun block up together in blank white while the foreground beach blocks up in black—thus doubling the massiveness of each—that his original intentions are lost to render water as wet, sky as endless and rock as hardness. In a sense this picture which was not previsualized is also "in” the negative. Many a photographer has discovered the non-literal interpretation in just this way, and if he likes the result he will not be slow to rationalize and rationalize until the non-literal interpretation is justified.
A photograph must thoroughly deviate from what the spectator would consider a faithful rendering of a given subject before it can be called a non-literal rendering. If the subject is unfamiliar to the spectator, considerable alteration can happen before he notices it. Unfortunately for the photographer everything has been photographed so often that nearly everybody knows what nearly everything looks like; furthermore "experimental” photography is a quarter of a century old now so that the typical derivations possible in the medium are no longer a novelty. In some cases a mild degree of nonliteralism happens when a normal contrast negative is printed on some other grade of paper than the #2 for which it was intended. Several kinds of prints can be produced, so for the sake of simplicity we will classify them. Starting with a normal negative (8 zone contrast) and printing it on a #1 contrast grade paper in an extra soft developer three classes of prints are possible:
A. Neither Zone IX white nor Zone Zero black is present. B. Zone Zero black is present but nothing lighter than Zone VII. C. Zone IX white, textured white (VIII) are present but nothing darker than Zone III or IV.
Because part of the tones of the scale are missing at either or both ends this series of prints are called short-scale. Some negatives respond surprisingly well to such treatment and yield emotionally convincing generally smooth and soft prints ; though (warning) unvisualized at the time of exposure. Again starting with a normal negative, but printing it on a #3 paper in an extra hard developer, three other kinds of prints are possible:
* Interpretation of significance behind visual facts is always a human activity. Consequently the term "literal interpretation” is in one way an impossibility. In human terms, however, it is inescapable. The documentary photographer, who takes pride in leaving himself out of his pictures does achieve a degree of reportage that includes the significance behind facts, which compared to the personal, deliberately personal interpretations of the artist-photographer appear objective indeed. An example will illustrate the philosophical implications of the term "literal interpretation.” The scene contains two people—they are the facts ; they are in love—that is the significance. A literal interpretation would show the relation between the two subjects. A personal or non-literal interpretation would include the photographer’s reaction to the relation, the third person photographer would be brought into the picture—obviously and deliberately.
A. Well defined detail in Zones VII and VIII, but blocked in the low zones. That is, the detail that would normally appear in Zones I up to IV are merged together in Zone Zero.
B. Clean separation of tones in the low and middle regions while the tones that would normally appear in VII and VIII are blocked up in blank paper IX.
C. Some tones blocked at both ends of the scale. Because some detail is blocked at one or both ends these variations are called over-scale.
Some negatives given the over-scaled treatment yield brighter harder prints of handsome quality. And while they were not previsualized it is tempting to accept them as the product of one own’s intensely creative self. To take such a print as an example of one’s consciously creative self is a bit dishonest; to offer it to a public as one’s deliberate work is still more dishonest, and from the standpoint of the discipline that the zone system develops in a photographer, not to be considered.
We can not overlook the fact, however, that a non-literal interpretation of the world about us is a legitimate process; even though a non-literal interpretation of a negative may be open to question. The zone system offers this solution to the problem: plan the non-literal interpretation of the visible world at the time of exposure.
The value of preplanning the non-literal interpretation is a matter of integrity on one hand and a subtle intangible quality of the convincing on the other. If one plans, visualizes and previsualizes the non-literal, the element of the accidental is removed.
When the spectator gets the notion that the photograph is all a happy accident that the photographer claims as his own, he may well accuse the photographer of phoniness. True the whole profession of photography may be considered a pursuit of chance and the accident, but a photograph must not convey the feeling that the photographer worked blindfolded. The idea behind the non-literal is not to convince the spectator of the photograph’s faithfulness to the original but to convince him of the presence of the photographer and the sincerity of the man. No matter how spontaneous or accidental or capricious the subject of the picture may be—and photography excels at capturing the unconscious gesture and the accidental flux—the photographer must convince the spectator that it was no accident that he was there and no accident that he saw what he did.
• How to accomplish all this? Constant practice in previsualization is the answer. To look at a scene and with the imaginary eye, transpose it into all the various kinds of literal and non-literal pictures that the medium will allow, and to select the one that suits his purpose is at the heart of convincing photography. The zone system is but a tool towards this end. The system as a method of brightness range control is as good as several other methods, but as a discipline that leads to clearer and deeper perception—that is another matter, ITS ULTIMATE VALUE TO ANY PHOTOGRAPHER IS THE DISCIPLINE THAT GROWS OUT OF IT.